Showing posts with label dollhouse. Show all posts

6.9.16

Mini Shells!

I've made a lot more progress since I last posted, and I've taken pics along the way however I need to sort through them before I upload some! I've completed the staircase (I made a few modifications to it).

In the meantime though, here's a few pictures of some shells I collected while on holiday in the North Island. Some of them are a little too big for 1/12 scale but I'll find something else to do with them! I couldn't believe how tiny some of them were, and yet they are still as perfectly formed as a large shell!


(As you can see, I stained the flooring for the dollhouse! ;) )


21.5.16

New Items

Got some more items in the mail that I ordered from miniatures.com! Put them in my "old" dollhouse for now which is just packed full of a mix-match of most of my furniture and accessories! Storing most of it there until the Beacon Hill is ready to be furnished :)


19.5.16

Stained furniture & mini plant


Before and after shots of the unfinished furniture I bought online a few weeks ago, which I stained tonight. I just used one coat of stain and wiped off the excess with a tissue. Really happy with how the blanket box turned out. I think I will add another coat of stain on the drawer of the wall table so it matches the sides a bit better. Then I will glue on the handles for the drawer.

Tonight I also finished making a miniature hosta plant using a tutorial and printout from weloveminiatures.com - I think it turned out pretty well! I wonder if the pot is slightly too big for the plant (I have three matching pots and that's the biggest) but oh well :P maybe the owners put it in this pot so the plant can "grow" into it ;) I will make some more hosta leaves to plant in another pot, and then some other plants as well.

Finally started the Beacon Hill!

Here's a few photos of my progress so far on the Beacon Hill! This was three days of work. 

The package came all the way from the US. Not cheap on postage haha.


Sorted out all the pieces and made a start! Lots of sanding!

Glued the foundation - the only part I have glued so far. The rest is just dry-fitted. I want to make sure everything fits well before gluing! I have one concern about the foundation, I think one side of the back wall of the foundation is slightly higher than the other, so I will try sanding the other side down a bit.


This all fits well and it taped to hold it firm. 

When I added the partition between the lounge/hall and the third floor, I noticed a little problem. For some reason, the partition sits on a slight angle (despite the tabs fitting perfectly into the slots) I don't know if perhaps it warped slightly, or what, but this means that there is a slight gap in the front corner of the second floor floor/first floor ceiling where it joins with the partition. For now I've left it, as I can't quite work out what to do to fix it. The third floor was quite challenging to insert, due to the partition being slightly wonky, and it was hard to get it into all the tabs. The tabs on the right and left sides of the house fitted perfectly but it was a challenge to get the middle one into the slot! This may be normal though. So, because of the wonky partition I haven't glued it yet. I've taped everything firm and straight so this may fix it, and it may fix itself with the addition of all the other walls etc. Failing all else I can possibly use some wood filler to fix the gap. 

5.5.16

New Items

My order arrived today from minimumworld.com - very pleased with everything. Currently in the process of handmaking some miniature Hostas which I will plant in 2 of these pots. The blanket box and hall table are both unfinished, I'll give them a nice walnut finish and add the handles to the drawer. Still awaiting some packages from other websites. I love online shopping, it's like getting a present in the mail for yourself! (Even though I had to pay for it...)

25.8.15

Rearranging

Rearranged a few of the rooms (in my current dollhouse, not the Beacon Hill just yet!) slightly to include some of the items I got for my birthday, as well as new items I've bought myself recently. Switched the bedroom and bathroom around, meaning the bathroom is in the attic now. Which is a thing about many dollhouses that I've never liked! But I just felt like changing things round a little. One of the main criteria when choosing a new dollhouse was that it had to have a somewhat realistic layout. No walking through bedrooms to get to other rooms etc., hence why the Beacon Hill was my final decision - love the hallways!

22.8.15

Rugs

Got some gorgeous wee rugs pretty cheaply off Amazon - exactly what I had in mind! I intend for the red one to be in the lounge and not yet sure about the blue. I know decorating the Beacon Hill is far in the future yet, but I just can't help myself haha.
They're a bit creased from being folded in the package but I'm sure I could iron them under a tea towel or shirt or something and flatten them out. Also the fringe on each of them is a tiny bit longer on one side but nothing that a quick trim can't fix and definitely worth it for $5 (NZ) each with free postage!

19.8.15

Moving On


 These are a couple of pictures I took whilst experimenting with my new DSLR. They're from the dollhouse I have at the moment. Still unsure as to what to do with it, whether I sell it and use the (much needed) money to buy supplies and accessories for the Beacon Hill or keep it. I do need somewhere to keep all my furniture etc while constructing the Beacon Hill so I suppose I'll keep it for a while at least!
Not really sure what it's worth either. It's a number of years old but in terms of condition it's basically brand new - not a scratch on it and I never wallpapered or did the flooring or even attached the staircases. It came as a flat pack (pre-painted etc) and I put it together but it's pretty sturdy so shouldn't be too hard to transport within the South Island. I think we paid about $300 for it, but I'd be happy with $200! But not really sure how to value it.


16.8.15

Greenleaf Beacon Hill - Happy Birthday To Me!


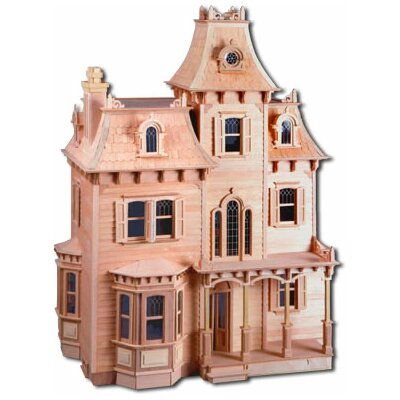
So recently my parents and I were finally able to order my belated 21st present - the Greenleaf 'Beacon Hill' dollhouse. It proved a little tricker than originally thought. Shipping from Greenleaf may be free within the US, however to New Zealand it was going to cost over $600. Not at all ideal when that's about twice the price of the kit itself. So, we finally managed to source it through another website instead - still pricey but slightly cheaper.


It should arrive sometime within the next 2 months, however I can't actually start work on it until Feb next year as I'm travelling around Europe. But it'll be great to have it waiting for me when I get home!

Been planning colour schemes and decorating ideas for months already now but will have to start really deciding! At the moment I'm considering white or cream exterior paneling with slate grey roof shingles for the outside, and inside white walls with dark stained wood floors.

I want to keep the general colour scheme fairly neutral and timeless so that it doesn't date too much over the years. I have a large collection of furnishings and accessories which are very colourful and plan to buy much more, and I feel that white/cream walls complement this much more than trying to match items in a "colour scheme".

The house is going to be "set" in modern the modern day. I plan on reflecting my own personal decorating style throughout the house, which is really easy as it's such an eclectic mixture of many different styles! The thing I love about modern day houses is that you still see older style items mixed in with the new. I want it to look like the items in this house have been collected over the years from travel or family heirlooms, with lots of contemporary art and fresh green plants.

Anyway I'll leave it at that for now, because I could probably write pages on the plans I have for this house!

13.4.15

Mini apples anyone?

Finished painting details onto the apples today, and whipped up a little wooden crate for them. Made need a bit of practice on that though as this one turned out a little wonky.

Mini minis

Just another pic of them, excuse the blu-tack haha!

12.4.15

Finally done.

Just in time for bed! I'm so ready to rest my sore eyes after painting these. Tomorrow I'm going to dry brush a little bit of tone onto the apples and potato.

Matryoshka dolls in progress

Will be so glad when these are done haha... they are cute but a lot of effort! Worth it though hopefully.

I'm back

So I've been inactive for far too long due to being away at uni but I'm home for a few weeks and tonight I tried using Polymer clay for the first time! I made a potato, apples and a set of matryoshka dolls which I am currently painting. So pleased with how everything came out so far! For my first time at least.

24.11.14

Fabric

Went hunting in my mother's fabric collection today... time to get cushion making!

18.11.14

Found a childhood painting...

I've been doing a clean out in my room at home of some of my old things and came across this watercolour painting I did of my old dollhouse. Would've been 10 or 11 when I painted this haha! Like I said in an earlier post this dollhouse is out in our garage. It's just a little too big for the average sized room!

15.11.14

Getting creative...

This afternoon and evening was spent getting creative with some of the things I bought today. Looks like I'm going to have to go back to the store over the next few days to buy more of some things as I've had some great ideas! Preparing for the festive season in miniature. Will set up an etsy store sometime in the next week!

Craft haul

Went to the craft shop today and spent over $60 on beads, paper and accessories to get creative with some things to open up my etsy store. Exciting!

Current Dollhouse

Here's some pics of my current dollhouse. As I said in the previous post I never decorated the floors or walls, and even the staircases are only blu-tacked in. Luckily this'll now make it easier for me to sell. It's furnished pretty simply. (Pictures aren't great as my camera was dead and I didn't have time to charge it. Used my phone camera, which is unfortunately cracked and sometimes gives a blurry effect.. But you get the idea.) Time to move on to bigger and better things!


Also, I have really not got the hang yet, of this blog... not really sure how I'm supposed to add pictures and things! Hopefully this worked.